Guides · Choosing a printer
How MSLA resin printers work—and how to choose one
Follow one layer from sliced pixels through a monochrome LCD and release film, then translate screen, build-volume and motion specifications into a sensible buying decision.
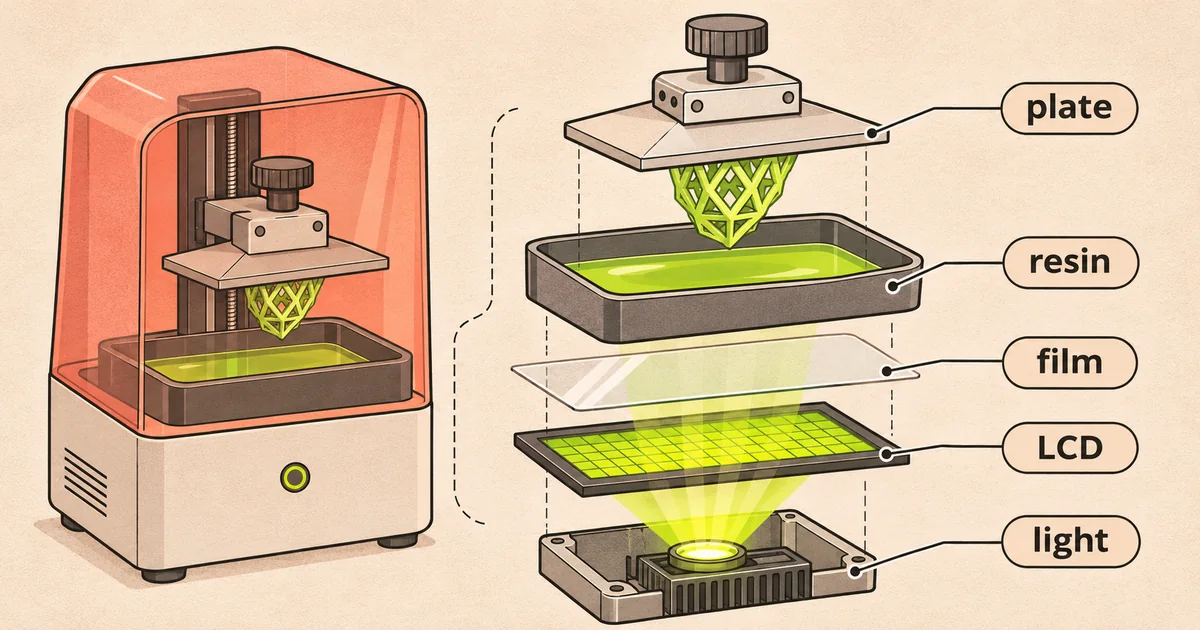
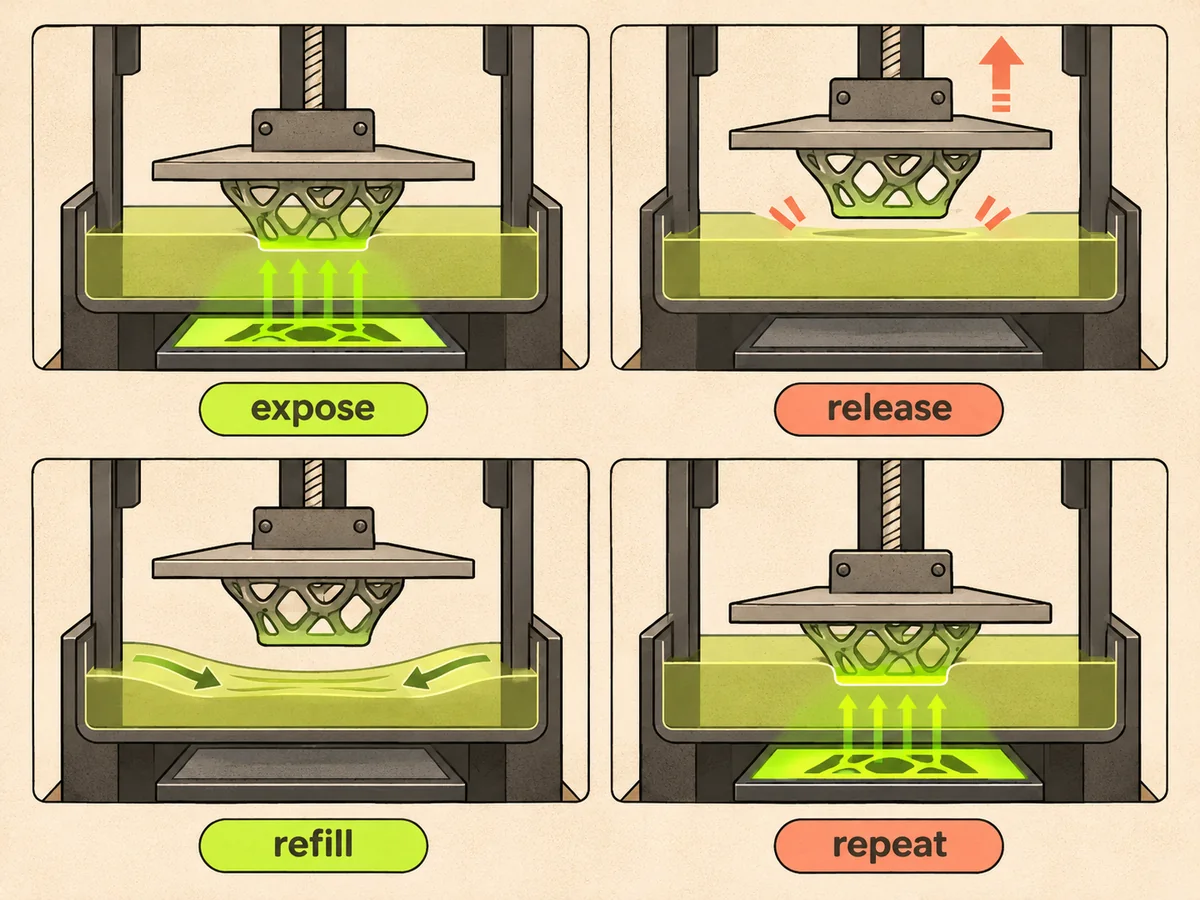
An MSLA printer forms a whole two-dimensional layer at once. A light source shines through a masked monochrome LCD, the transparent bottom of the vat and a thin layer of liquid photopolymer. Lit areas polymerise; masked areas remain liquid. The build plate then moves so that the cured layer releases from the vat film and fresh resin can flow beneath it.
The cycle explains most buying specifications and most failures. Pixel dimensions affect the XY grid. Z mechanics and layer height affect vertical sampling. Light, exposure and resin determine cure. Film, motion and cross-sectional area determine release. No single number controls all of them.
From model to masks
A slicer intersects the three-dimensional mesh at each chosen layer height and converts that cross-section into an image plus motion instructions. It can also hollow the model, add drain holes and generate supports. CHITUBOX documents hollowing as a material-saving operation and holes as paths that allow resin to escape.
The printer does not understand the artistic intent. An unsupported island is simply a lit patch with no adequate cured path to the plate. A sealed hollow is simply a sequence of areas that can trap resin and create suction. Inspect the layer preview; automatic support generation is a proposal, not proof.
Layer height describes vertical slice spacing, not total precision. Elegoo lists 0.01–0.2 mm for the Mars 5 Ultra; Anycubic lists 0.01–0.15 mm for the Photon Mono M7 Pro. The lowest permitted value creates more layers and longer exposure cycles, and may reveal little extra detail if the model, pixel grid, resin or post-processing is the limiting factor.
LCD resolution and pixel pitch
“9K”, “14K” and “16K” count pixels across a screen dimension. A larger screen can have a higher count yet similar pixel size to a smaller lower-count screen. Pixel pitch—normally stated in micrometres—is the clearer comparison of projected XY sampling.
Elegoo publishes 18 × 18 μm XY for the 7-inch 9K Mars 5 Ultra. Anycubic publishes 16.8 × 24.8 μm for the 10.1-inch 14K M7 Pro. Those rectangular M7 pixels show why a single diagonal screen size or “K” label is incomplete.
Pixel pitch is still not dimensional accuracy. Light can spread, resin can shrink, supports can distort and wash or cure can change a part. Manufacturer accuracy claims often use particular conditions. For a fitting or engineering master, calibrate dimensions on the exact resin and orientation rather than assuming the pitch is the tolerance.
Monochrome LCD and screen life
The LCD selectively transmits UV; repeated exposure and heat age it. A monochrome LCD generally exists to transmit the printing wavelength more efficiently than older colour-mask designs, but “mono” does not mean permanent. Screen life depends on machine design, temperature, exposure and use.
Do not rely on an unsourced lifespan in hours. Read the warranty, check the price and UK availability of the exact replacement LCD, and find the maker's replacement procedure. Also identify whether there is a replaceable protector above the LCD. A resin leak can damage a protector, polariser, screen or internal electronics depending on the machine.
Run the documented screen or exposure test if prints suddenly show missing columns, patches or repeated defects. Do not stare at an unshielded UV source; follow the manual and keep covers in place where instructed.
Build volume and batch speed
Build volume is the usable X × Y × Z envelope. X and Y determine how many objects fit in a layer; Z determines maximum height. Since an MSLA printer exposes the whole layer image together, adding another miniature beside the first may add little to layer time. Stacking vertically or using a smaller layer height adds layers and therefore time.
Large plates are not free capacity. They create heavier wet hardware, larger peel areas, more resin held in the vat and bigger wash requirements. A narrow plate can be better for occasional miniatures; a medium plate suits batches and busts. Import representative models and arrange them in the slicer inside the published rectangle.
Maximum print-speed claims usually depend on a specified layer height, fast resin and motion mode. Anycubic's M7 page separates standard and high-speed figures. Treat such numbers as a maker's scenario, not a prediction for a detailed model with conservative supports.
Release systems
Traditional machines lift the plate away from a stationary FEP or PFA film. Some newer printers tilt the vat to peel the layer. Others use ACF film and fast lift profiles. The aim is the same: separate the new layer without detaching it from the model or plate.
Phrozen says FEP, PFA/nFEP and ACF all transmit UV and form the vat surface, and that they need periodic replacement. Use the type specified by the printer. Film condition, tension, resin temperature, model area, lift or tilt settings and supports interact. Read FEP vs nFEP vs ACF before treating film as an upgrade.
Light source and exposure
Most hobby MSLA resins and machines in this comparison use a 405 nm-class system, but compatibility must be stated by the maker. Exposure cures each normal layer; bottom exposure and bottom-layer count create stronger plate adhesion at the start. Too little exposure can produce weak layers or failure. Too much can close holes, thicken features and make supports harder to remove.
Use a profile for the exact printer, resin, colour and layer height. Control temperature within the resin's instructions, mix the resin as directed and print a calibration model. Change one setting at a time and record it. A profile from another light engine is a clue, not a safe default.
Network, sensors and automation
Wi-Fi, cameras, residue detection, auto-fill, heating and “automatic levelling” can reduce steps or detect particular conditions. They do not inspect the vat for you or make a chemical process unattended-safe. A residue sensor may have thresholds; auto-fill adds tubing; a camera may depend on cloud services; a heater applies a machine target that must still suit the resin.
Ask whether the printer completes a local USB workflow without an account, whether firmware is still maintained and whether sensor failures can be diagnosed. Pay for features that solve your repeated task, not for the longest feature list.
A rational choice sequence
- Choose the largest real object and normal batch, then size X, Y and Z.
- Compare pixel pitch, not only screen resolution.
- Check exact slicer, file format and profile support.
- Price release film, LCD, protector and spare vat.
- Fit the plate and models into a wash-and-cure workflow.
- Read the manual, warranty and safety documents before ordering.
- Plan the room and waste route before opening resin.
The UK shortlist applies that sequence to five current maker-documented models.
Sources
- Elegoo Mars 5 Ultra specifications — maker page, accessed 15 November 2026.
- Anycubic Photon Mono M7 Pro — maker page, accessed 15 November 2026.
- Phrozen release-film comparison — maker support, accessed 15 November 2026.
- CHITUBOX model editing — software documentation, accessed 15 November 2026.
Read next
Compare the Elegoo Mars 5 Ultra, Saturn 4 Ultra 16K, Anycubic Photon Mono M7 Pro, Phrozen Sonic Mini 8K S and Creality HALOT-MAGE S by published build area, pixel size and workflow.
Choosing a printerBest resin printer for miniatures: what the numbers really meanA specification-led comparison for tabletop miniatures, focusing on pixel pitch, build area, release system, supports and the complete wash-and-cure workflow.
TroubleshootingFEP vs nFEP (PFA) vs ACF release filmUnderstand what the three vat-film names mean, why printer compatibility outranks generic claims, and when damage or rising failure rates justify inspection and replacement.