Guides · Printing and post-processing
Resin supports, orientation and hollowing: a layer-by-layer method
Orient resin models by cross-section and visible surfaces, support every island through a load path, and hollow only with drain and vent openings that work during print and wash.
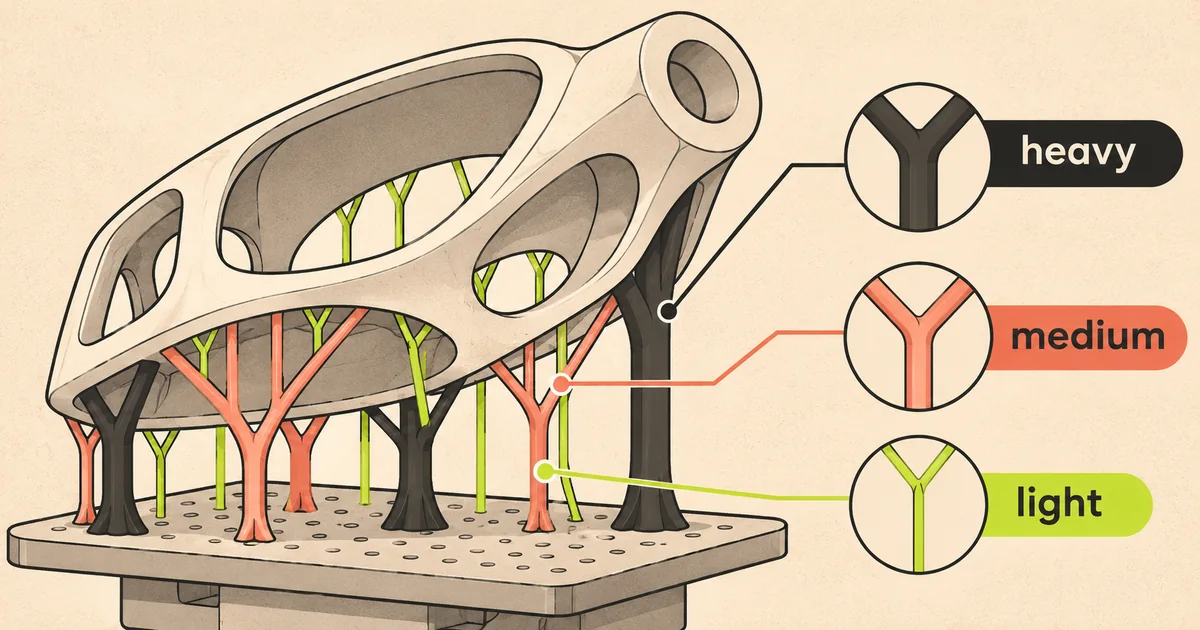
Good support work creates an unbroken structural path from every newly exposed island back to the build plate while keeping contact scars away from important surfaces. Orientation changes that load, the surface staircase and where liquid can drain. Hollowing can reduce material and cross-section, but a sealed cavity can trap resin and create suction.
There is no universal angle, support density or wall thickness. Start with the model, then apply the resin maker's profile and the printer's documented motion. Inspect every layer transition instead of trusting a one-click result.
Think in layers, not objects
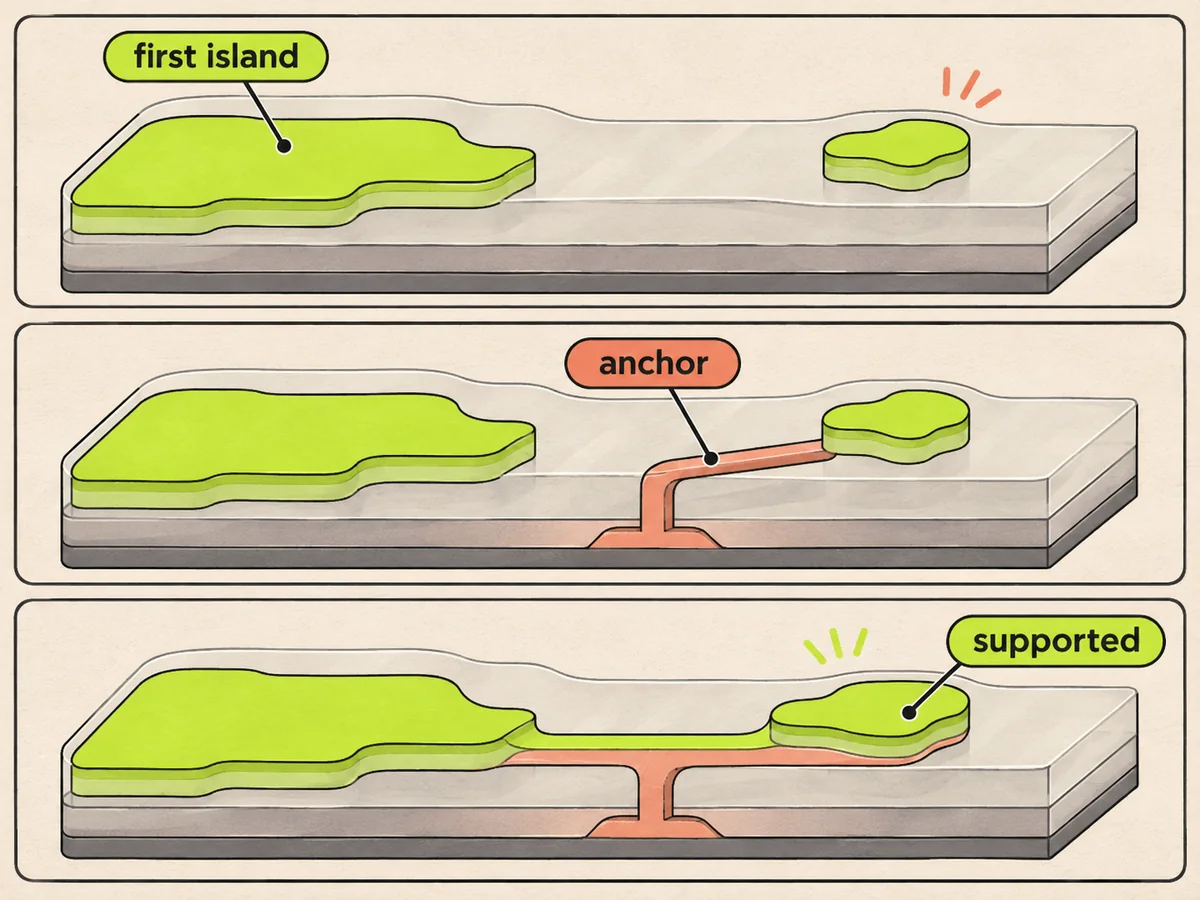
The slicer shows a familiar figure or bracket; the printer receives masks. At each step, ask what pixels appear for the first time and whether they connect to cured material strong enough to hold them. A fingertip, sword tip, coat hem or internal ceiling can be an island even when the final object looks continuous.
Scroll from the build plate upwards. Mark the first pixel cluster of each feature. Automatic island detection can help, but review threshold settings and hidden internal regions. A support touching a later layer does not rescue the earlier floating layer.
Choose the presentation surfaces
Decide which faces must stay free of contacts: a miniature's face and chest, a mould master surface, a mating face or engraved lettering. Turn those away from supports where possible. Put unavoidable contacts on hidden, sandable or less critical regions.
Tilting a flat face can reduce a sudden broad cross-section and distribute layer transitions, but it also creates staircase sampling and can lengthen the print in Z. The right orientation balances surface, supports, peel load, height and drainage. An arbitrary 45-degree rule ignores the model.
For dimensional parts, avoid placing a critical hole or flat solely by aesthetic preference. Print shrinkage, support pull and pixel sampling can make X, Y and Z behave differently. Add calibration allowances only after measuring the exact resin and process.
Build a support load path
Start with the earliest and heaviest mass. Use strong anchor supports where the model first develops enough area to pull against the film. Medium supports stabilise later mass. Light supports can catch delicate islands and edges after a strong path exists.
A field of light supports is not equivalent to a few correctly placed structural anchors. Each small contact can flex, letting the layer shift or tear. Conversely, an oversized tip can damage the model during removal. Change contact diameter, penetration and shaft based on the local feature and resin behaviour, then test a small representative piece.
Brace tall supports so they do not act as independent springs. Avoid long unsupported columns and abrupt transitions. Check that support bases sit on the raft and that the raft has drainage routes rather than forming a large suction cup.
Cross-section and release
Every cured layer must separate from FEP, PFA/nFEP or ACF film. Phrozen describes all three as transparent vat films and links ACF with reduced suction force in its systems. That does not remove cross-sectional loading. A broad flat layer still asks the model, supports, plate adhesion and motion to carry more release load than a small one.
Use the layer area graph if the slicer provides one, and watch for sudden jumps. Rotate or split a model to smooth them. A large hollow can reduce cured area, but only if its walls and openings avoid a trapped pressure zone. Increasing lift distance or exposure is not the first answer to bad geometry.
Hollowing deliberately
CHITUBOX documents hollowing as a way to reduce material. It creates an interior wall and often a large internal cavity. Choose wall thickness using the resin and model requirements; a display shell and a functional jig need different structures. Very thin walls can warp during print, wash or cure.
Inspect internal islands created by hollowing. A roof inside the shell can begin as unsupported pixels even though the outside is well supported. Internal supports can be impossible to remove and can retain resin. Sometimes splitting the model or keeping it solid is the safer option.
Small miniatures are often better solid. The saved resin may be trivial compared with the cleaning difficulty and risk of a sealed cavity. Use the cost helper with the slicer's actual volume rather than assuming hollow is always economical.
Drain holes and vent holes
CHITUBOX describes drilled holes as a way for resin to escape. A useful hollow generally needs a low drain opening in the print orientation and another opening that admits air, preventing an airlock. Their positions must also work during washing and drying.
Place openings where they can be cleaned and inspected. A tiny decorative hole can clog or retain viscous resin. Do not seal openings until the inside has been washed, fully drained, dried and post-cured as the resin maker instructs. If UV cannot reach the interior, follow a validated maker process; do not assume an exterior cure makes trapped liquid safe.
A cavity that presents a closed cup towards the film can resist release as its volume changes. Add an opening before that cup forms in the layer sequence. A hole that appears hundreds of layers later does not relieve the earlier suction.
Rafts and bottom layers
The raft transfers the whole support structure to the plate. Its shape should avoid a sharp vertical wall that traps resin at the edge and should include a removal feature that does not invite a blade towards your hand. Use the slicer's printer profile as a starting point.
Bottom exposure is intentionally stronger to bond the raft. Excess can produce a thick expanded edge and make removal hazardous; too little can detach the job. Use the resin maker's profile for the printer, colour and layer height, then calibrate. Do not compensate for an unlevel or contaminated plate with unlimited bottom exposure.
Before exporting
- Scroll every layer and locate first islands.
- Confirm a structural support path for each major mass.
- Review the layer-area graph for abrupt peaks.
- Inspect contact points on visible and mating surfaces.
- Inspect hollow interiors for islands and trapped chambers.
- Verify drain and vent openings exist from the first cup-forming layer.
- Check raft edges, support bracing and build-volume clearance.
- Confirm the profile matches the exact printer, resin, colour and layer height.
After a failure
Do not simply add supports everywhere. Identify the first bad layer in the physical print and sliced preview. If the raft remains but supports stop at one height, examine cross-section, suction and support strength. If only one island is missing, add a path at its first appearance. If the entire print stays on the film, investigate bottom adhesion, levelling, plate condition and profile.
Remove cured debris from the vat using the printer maker's documented method before another run. Inspect the release film for damage. The failed-print guide provides a symptom sequence.
Sources
- CHITUBOX model editing documentation — slicer documentation, accessed 15 November 2026.
- Phrozen release-film comparison — maker support, accessed 15 November 2026.
- Anycubic Photon Mono M7 Pro specifications and release system — maker page, accessed 15 November 2026.
Read next
A specification-led comparison for tabletop miniatures, focusing on pixel pitch, build area, release system, supports and the complete wash-and-cure workflow.
Printing and post-processingBest wash and cure stations: size the workflow, not the badgeCompare Elegoo Mercury Plus V3.0 and Anycubic Wash & Cure 3 Plus by published washing and curing capacity, then decide whether separate stations suit you better.
Printing and post-processingWashing and curing resin prints without losing control of wasteA step-by-step post-processing workflow for draining, two-stage washing, support removal, drying, UV post-cure and segregating contaminated liquids and solids.